After you have Tested Your Connection with one computer to CyberDNS servers, you can change your network configuration to point all outbound DNS traffic to our servers. This will ensure comprehensive filtering and security coverage for all devices on your network.
Depending on how your network is setup, there are several different ways to make the change:
- If you operate an Active Directory environment, you can configure CyberDNS as your Forward Zone.
- If you run a non-AD environment, you can configure CyberDNS on your:
- Router (good for smaller networks)
- DHCP Server (good for any size network and for use with NAT IPs )
- Firewall (can be used standalone to force query traffic or in concert with router/DHCP options)
Do not mix DNS Providers
Many DNS clients are configured to send queries in a round-robin style. Because of this, it is necessary only to list CyberDNS servers on your configuration. Otherwise, some queries will not come to us and will escape the filtering policies that you have set.
Do not assign DNS directly to endpoints
It is recommended that you do not assign CyberDNS’s servers directly to your client devices. This is because you will break resolution with local named resources (servers, computers, printers). It is far better to set CyberDNS as a DNS forwarder through the means outlined in this article.
Configure CyberDNS on Active Directory
Many larger organizations utilize Microsoft Active Directory to manage their computing resources. CyberDNS can be configured as a Forward Zone so that your entire network is protected by a filtering Policy. Only a simple configuration change is required, and there is no interference on your LAN. You can also install our Roaming Client via Active Directory so that individual devices have different policies. This is useful in situations where staff or executives need to have an alternate policy from the main site.
As shown in the diagram below, the endpoints are already set to communicate with Active Directory for DNS resolution. When local queries are sent, they are resolved by the Domain Controllers. When an internet query is sent, the Domain Controller recognizes that it cannot resolve locally, so it will send the queries to CyberDNS for resolution. CyberDNS never sees or charges for your local queries.

The fastest way to configure DNS forwarding is by logging on to the Domain Controllers and issuing the PowerShell command below to replace the forwarders with the CyberDNS Anycast IPs.
# Get the current list of forwarders
# Useful to save before overwriting
Get-DnsServerForwarder

# Set forwarders to CyberDNS
Set-DnsServerForwarder -IPAddress '45.76.158.155' -UseRootHint $False -PassThru
You may also refer to the screencast below for the GUI method of replacement:
Once this has been set, changes will instantly take effect. This is because LAN devices already go to the Domain Controllers (DCs) for resolution. The DCs will now forward internet queries from all devices through CyberDNS and allow/block based on what you have set in the dashboard.
If you wish to put some devices on a different policy, you can install our Roaming Client via Active Directory.
Configure CyberDNS on Your Router
Setting CyberDNS servers on the router is a common setup for smaller locations, such as in a small office/home office (SOHO). This configuration uses the router as a DNS forwarder. Queries from network clients go to the router for resolution. The router then sends WAN queries through the network gateway to CyberDNS.
Use Cases:
- Home / Personal
- Small Offices
- No Local Authentication (Active Directory, LDAP, Radius, etc)
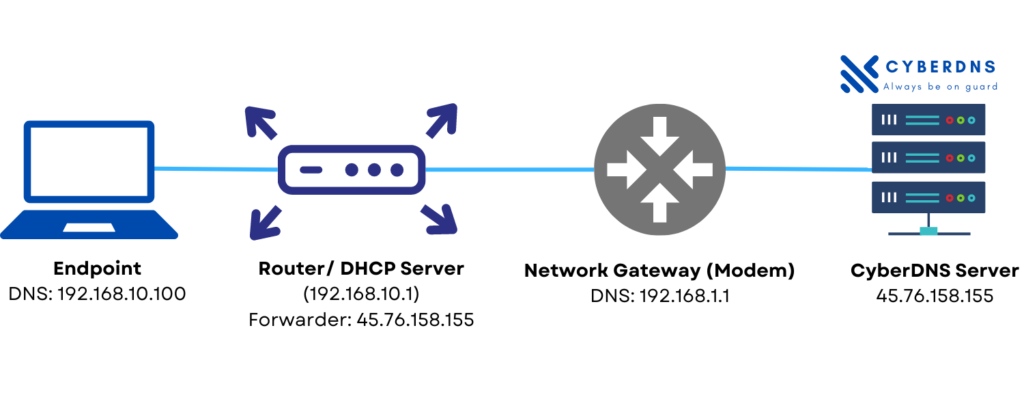
Due to the variety of router manufacturers in existence, CyberDNS does not provide directions for this procedure. You should easily be able to find this by searching Google for the instruction manual for your particular make and model of router. You will look to add the CyberDNS Anycast IPs into the DNS forwarding section of your router’s configuration.
Configure CyberDNS on Your DHCP Server
You may use your DHCP server to hand out CyberDNS’s IPs directly to clients. Remember the warning at the beginning of this article that to do so will break local by-name resolution (e.g. Jeff-PC, Jane-Printer). On some networks, this may not be an issue, such as Guest WiFi.
This configuration is also desirable for utilizing our NAT IPs feature, which allows you to create multiple filtering policies that correspond to your network subnets.
Use Cases:
- Guest Wi-Fi
- No LAN Resources (printers, servers, resource sharing)
- Utilizing the NAT IPs feature

Due to the variety of equipment manufacturers in existence, CyberDNS does not provide detailed directions for this procedure. If you are using a router, this setting is commonly found under the “DHCP Server” section of the configuration. You will replace the DNS server IPs with the CyberDNS Anycast IPs. For Cisco Meraki equipment, there are instructions here.
Configure CyberDNS on Your Firewall
Hardware firewalls / virtual appliances can be configured to forward DNS queries to CyberDNS, regardless of what network clients have set on their network adapters. This is useful in scenarios where users are likely to attempt to circumvent the filtering by changing the DNS settings on their device. It is also useful if your Internet Service Provider is running a transparent proxy (redirecting DNS queries to their servers) because you can forward queries to port 5353 or 5354(udp only).
Use Cases:
- School networks
- ISP has a transparent proxy
- Locations where users have access to change their DNS settings
In order to set this on your firewall, you’ll create either a NAT rule or port-forwarding rule to set all UDP and TCP port 53 traffic to CyberDNS’s Anycast IPs. You can check the Preventing Circumvention and Transparent Proxying articles for example of firewall rules that can be set.
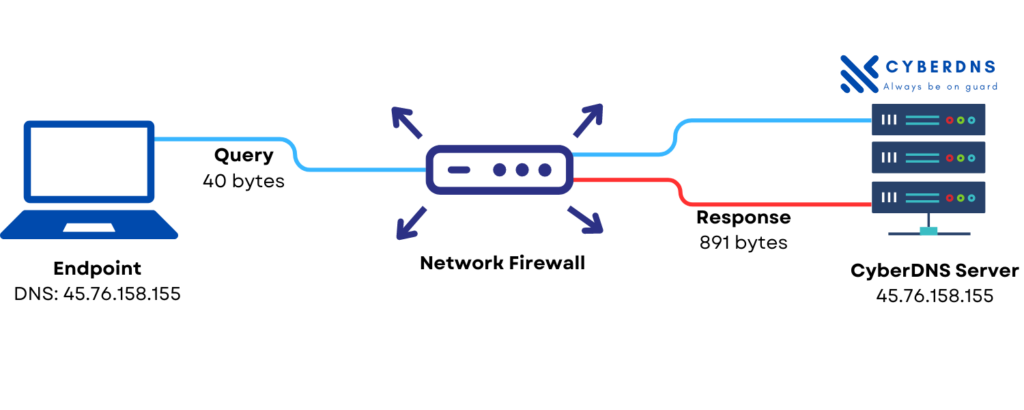
Check packet size
The DNS protocol originally had a 512-byte maximum packet size. Modern usage of the DNS protocol can sometimes require a packet size of up to 4096 bytes. If the firewall is set to block/drop DNS packets less than 4096 bytes, this could result in DNS timeouts. Please check your firewall ruleset to be sure.
Connection Ports / Protocols
CyberDNS Ports
In order to enable customers to overcome Transparent Proxying, CyberDNS receives DNS traffic on the following ports:
- 53 (udp/tcp)
- 5353 (udp/tcp)
- 5354 (udp)
- 853 (tcp)(DNS-over-TLS)
DNSSEC Support
CyberDNS fully supports DNSSEC by pointing your equipment to these DNS addresses:
- 45.76.158.155
However, CyberDNS only recommends utilization for organizations that understand two very important points:
- Low internet adoption – Most internet domains (including well-known email providers) do not support DNSSEC, which means turning the feature on will cause failures in resolving a large portion of internet domains. This will be perceived by the end user as a failure with their ISP or with our service.
- DNSSEC outages – Even domains which do support DNSSEC have been known to have failures that last several days or weeks.