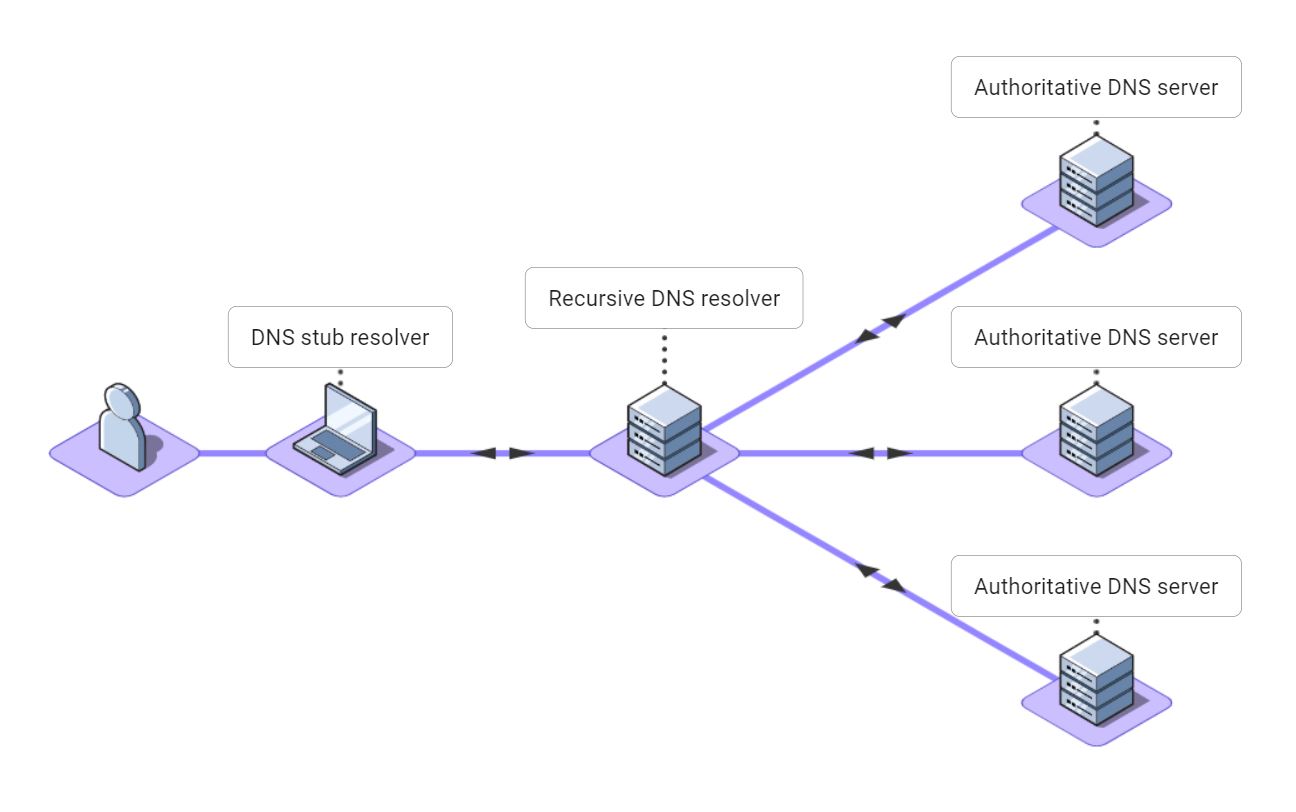
A DNS stub resolver is an operating system component that performs DNS name resolution for applications running on a computer, cell phone, or another Internet-connected device.

Why is it called a stub resolver?
A stub resolver is a partial DNS resolver. It relies on the services of a recursive DNS resolver. Stub resolvers were first formally defined in 1989 in section 6 of RFC 1123.
A stub resolver converts name resolution requests from applications like web browsers into DNS request messages. The stub resolver sends the DNS request messages to a DNS recursive resolver and returns the result to the application.
Stub resolvers don’t perform recursion themselves. Instead, they talk to a recursive DNS resolver which performs recursion on their behalf. This allows many stub resolvers to collectively share the cache of the recursive DNS resolver. This speeds up name resolution for all the stub resolvers and reduces the overall load on the DNS.
Stub resolver or DNS client?
The terms stub resolver and DNS client are used interchangeably to mean the same thing: a software component or service running on a computer that sends DNS messages to a recursive DNS resolver and caches the results.
Historically the term stub resolver was used. A DNS stub resolver can be considered a client of a recursive DNS resolver. So, later the term DNS client was coined.
Linux-based operating systems generally use the term stub resolver, and the Windows operating system uses the term DNS client.
How does a DNS stub resolver work?
The DNS stub resolver is a part of the operating system running on a computer, cell phone, or another device. It talks to a recursive DNS resolver to convert DNS names into IP addresses for all the applications running on the device.
Typically, DNS stub resolvers are used like this:
- A user types a DNS name such as www.google.com into an application like a web browser.
- The application makes a standard operating system call to request a DNS lookup for the name.
- The DNS stub resolver on the device creates a DNS message for the request and sends it to a DNS recursive resolver.
- The DNS recursive resolver consults its cache and various authoritative DNS servers to find the address for the name. See our article on Recursive vs Authoritative DNS for more information.
- The IP address for the name is sent back to the stub resolver. The stub resolver caches the IP address and returns it to the application.
- The web browser can now connect to the IP address and display the web page.

Which DNS recursive resolver?
How does a DNS stub resolver know which DNS recursive resolver to use?
Each time a computer or another device connects to a network, its DNS stub resolver is automatically configured to use the recursive DNS resolver for that network. Usually, this recursive DNS resolver belongs to the ISP or cellular data carrier.
You might want to use a different DNS recursive resolver for privacy, speed, or reliability. Or one that provides features like filtering for inappropriate websites.
All operating systems allow the user to specify a DNS recursive resolver of their choosing. Some popular recursive DNS resolver are:
- Cloudflare – 1.1.1.1: One of the fastest open DNS resolvers available.
- Google – 8.8.8.8: The largest open DNS resolver, handling over a trillion queries per day.
- OpenDNS – 208.67.222.222: Offers a security product suite called “Umbrella” in addition to being an open DNS resolver.
- Quad9 – 9.9.9.9: A global open DNS resolver operated by a Swiss not-for-profit that aims to improve privacy and cybersecurity.
Checking DNS stub resolver configuration
If you have an issue with DNS, check how your DNS stub resolver is configured. On Windows 10 or 11:
- Open the Control Panel.
- Click on Network and Internet.
- Click on Network and Sharing Center.
- Click Change adapter settings on the left side of the window.
- Right-click on the appropriate Network Connection, usually called “Wi-Fi”, and click Properties.
- Double-click on Internet Prococol Version 4 (TCP/IPv4)
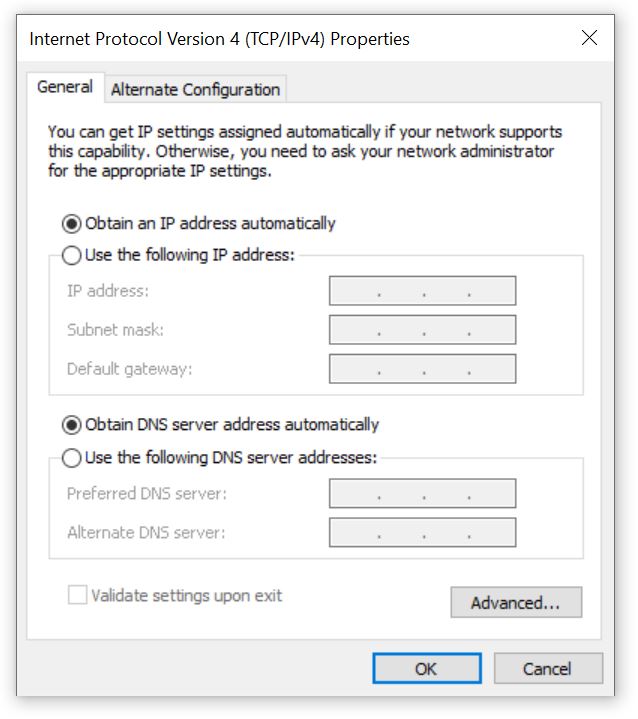
You will see a dialog like the one below. If you want the Windows DNS stub resolver to use the default DNS recursive resolver, ensure that “Obtain DNS server address automatically” is selected and click OK. If you are having trouble with DNS, this is the safest choice.
Select “Use the following DNS server addresses” if you want the Windows DNS stub resolver to use a public DNS recursive resolver. For Google DNS, enter 8.8.8.8 and 8.8.4.4 as the preferred and alternate DNS server addresses. For Cloudflare, enter 1.1.1.1 and 1.0.0.1. Other public DNS recursive resolvers will have their IP addresses in their help guides.

DNS stub resolver on Mac OS
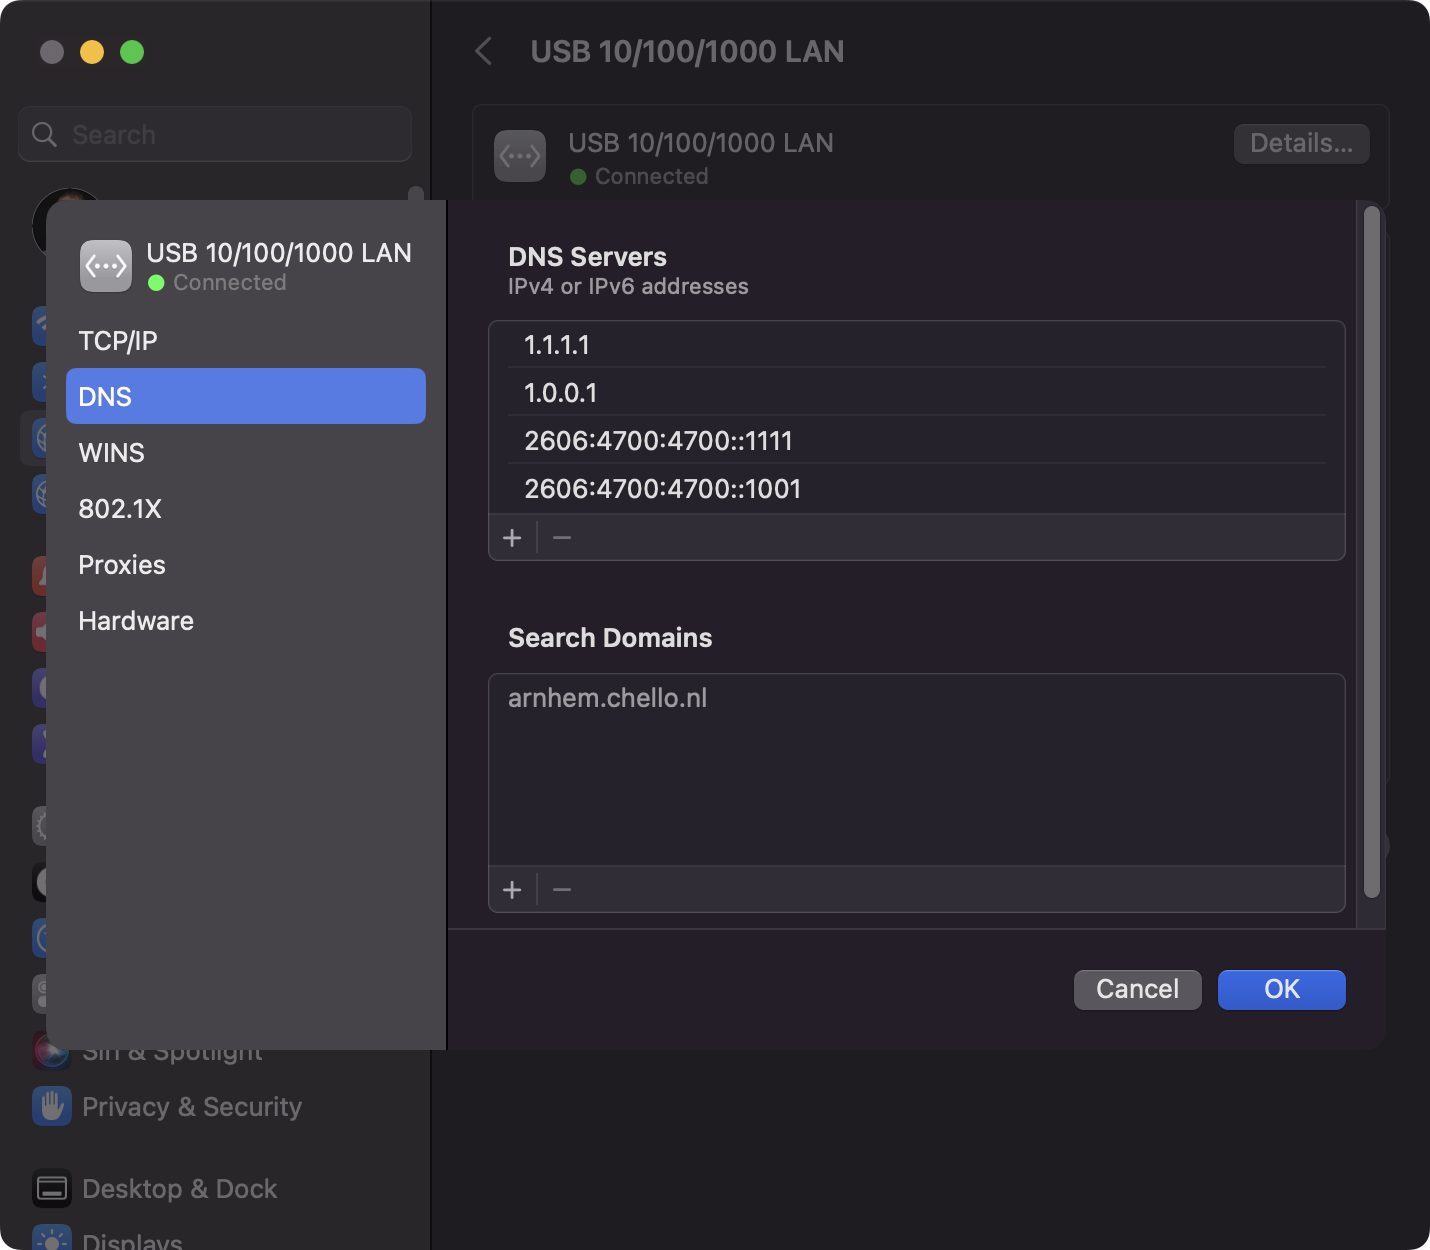
On Mac OS to get to the DNS stub resolver settings:
- Open System Settings from the Apple menu
- Click Network in the sidebar
- Click on your network connection
- Click Details
- Click DNS

How do you bypass the DNS stub resolver?
The hosts file is a special text file that contains DNS entries. The DNS stub resolver uses names and addresses in the hosts file instead of sending a query to the DNS recursive resolver to respond to application name resolution requests.
Perhaps you are testing a website on your laptop, and you want the hostname mytestwebsite.example.org to resolve to the IP address 10.10.10.10. You would add this line of text to the hosts file on your laptop:
10.10.10.10 mytestwebsite.example.org
Virtually every operating system supports the hosts file and uses the same file format, but the hosts file is located in different places:
- Windows: %SystemRoot%\System32\drivers\etc\hosts
- Mac OS: /etc/hosts (which is a symbolic link to /private/etc/hosts)
- Most versions of Linux: /etc/hosts
- Android: /etc/hosts
The hosts file can be used to block name resolution by inserting an invalid address for a name. This is useful if you want to prevent certain DNS names from resolving. Some ad-blocking software packages use this to prevent advertisements from being displayed.
Fixing a broken DNS resolver
Since DNS is so critical, you’ll probably be painfully aware if your stub resolver is not working properly!
If you wish to compare the results of your stub resolver against another resolver, you can run a command line tool like ping, nslookup, or dig and compare the results obtained from our A record lookup.
The ping command line tool is handy because it invokes the DNS stub resolver in the same way as a web browser or another application. If you were to accidentally misconfigure your DNS stub resolver by specifying a DNS recursive resolver address of 8.8.8.9 (instead of 8.8.8.8), you would find that you could not reach any websites. On Windows, you would see output like this:
C:\ > ping www.google.com
Ping request could not find host www.google.com. Please check the name and try again.

C:\> nslookup www.google.com
DNS request timed out.
    timeout was 2 seconds.
Server:  UnKnown
Address:  8.8.8.9
DNS request timed out.
    timeout was 2 seconds.

C:\> dig www.google.com
; <<>> DiG 9.10.3 <<>> www.google.com
;; global options: +cmd
;; connection timed out; no servers could be reached
Here are some steps to take if you are having trouble with your DNS stub resolver:
- Open your hosts file and check for unexpected lines that might interfere with normal name resolution
- Check your DNS stub resolver configuration and see if unexpected preferred or alternate DNS servers are set
- Try changing your DNS stub resolver to “Obtain DNS server address automatically”
- Try changing your DNS stub resolver to use Google DNS by setting the DNS server addresses to 8.8.8.8 and 8.8.4.4
- Try changing your DNS stub resolver to use Cloudflare by setting the DNS server addresses to 1.1.1.1 and 1.0.0.1
